- Name the parts of the default window and say what each one is for — in Blender and in Unreal.
- Point at X, Y and Z in either program and say which way is forward in each.
- Orbit, pan and zoom without thinking, and get back to a lost object in two keystrokes.
- Tell Object mode from Edit mode at a glance, and switch between them.
- Move, rotate and scale by keyboard, type an exact value, and read the N panel.
- Find any command you don't know the key for, and find the panel that lets you adjust what you just did.
- Recognize the five things that cause most beginner "it won't work" moments.
Keys on these pages are PC keys — Ctrl, Alt, Shift. On a Mac, read Ctrl as Ctrl (Blender uses the real Control key on Mac for most of these) and Alt as Option. The screenshots were taken in Blender 5.2 on a Mac; the interface is identical on Windows apart from the menu bar at the very top. If a screenshot looks different from your screen, check that you are in the same mode (Part 6) before you assume anything else.
Unreal is where this course lives; these pages are about getting assets out of Blender and into it intact.
Part 1 · 5 min Two settings before you start
Blender assumes a three-button mouse and a full keyboard with a number pad. Most laptops have neither. Fix both now or half the shortcuts in this course will do nothing.
- Open Blender, dismiss the splash screen
Click anywhere outside the splash, or choose General under New File. You get the default scene: a cube, a camera and a light. That cube is the thing you will practice on today.
- Edit → Preferences → Input
Tick Emulate Numpad if your keyboard has no number pad (most laptops). The number keys along the top of your keyboard now act as the numpad, which is how Blender switches views. Tick Emulate 3 Button Mouse if you are on a trackpad or a two-button mouse: Alt + left-drag then does what middle-drag would do. Close the window — preferences save themselves.
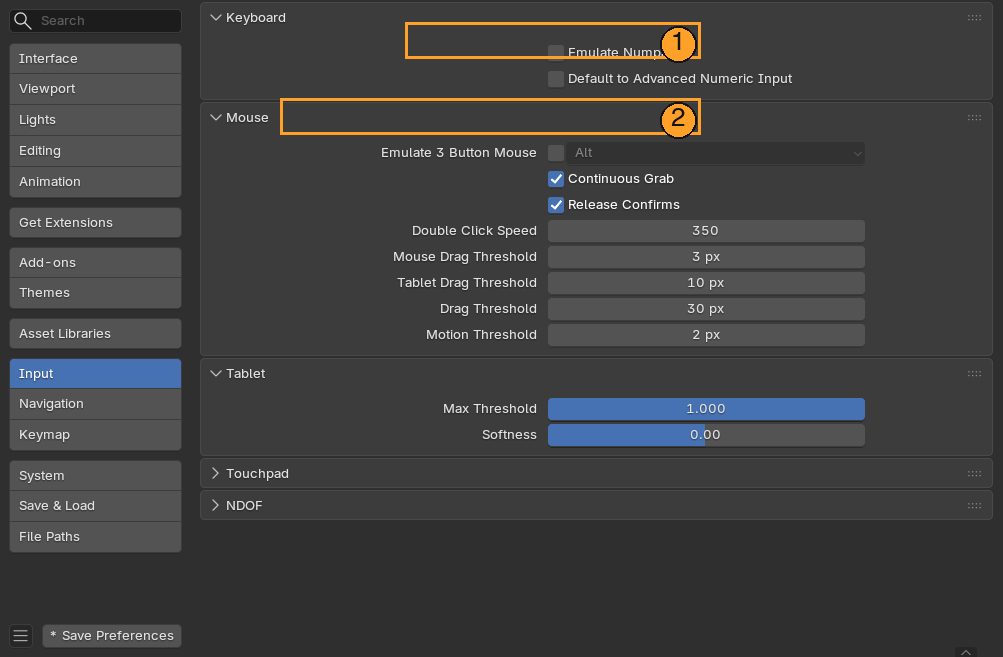
Preferences → Input. 1 Emulate Numpad, for laptops without a number pad. 2 Emulate 3 Button Mouse, for trackpads. Tick what applies to your machine and close the window.
Part 2 · 10 min The window, named
Everything you see is an editor living in an area. The default layout has four areas. Learn their names now, because every later instruction says things like "in the Properties editor, on the Modifiers tab", and you need that to mean somewhere.
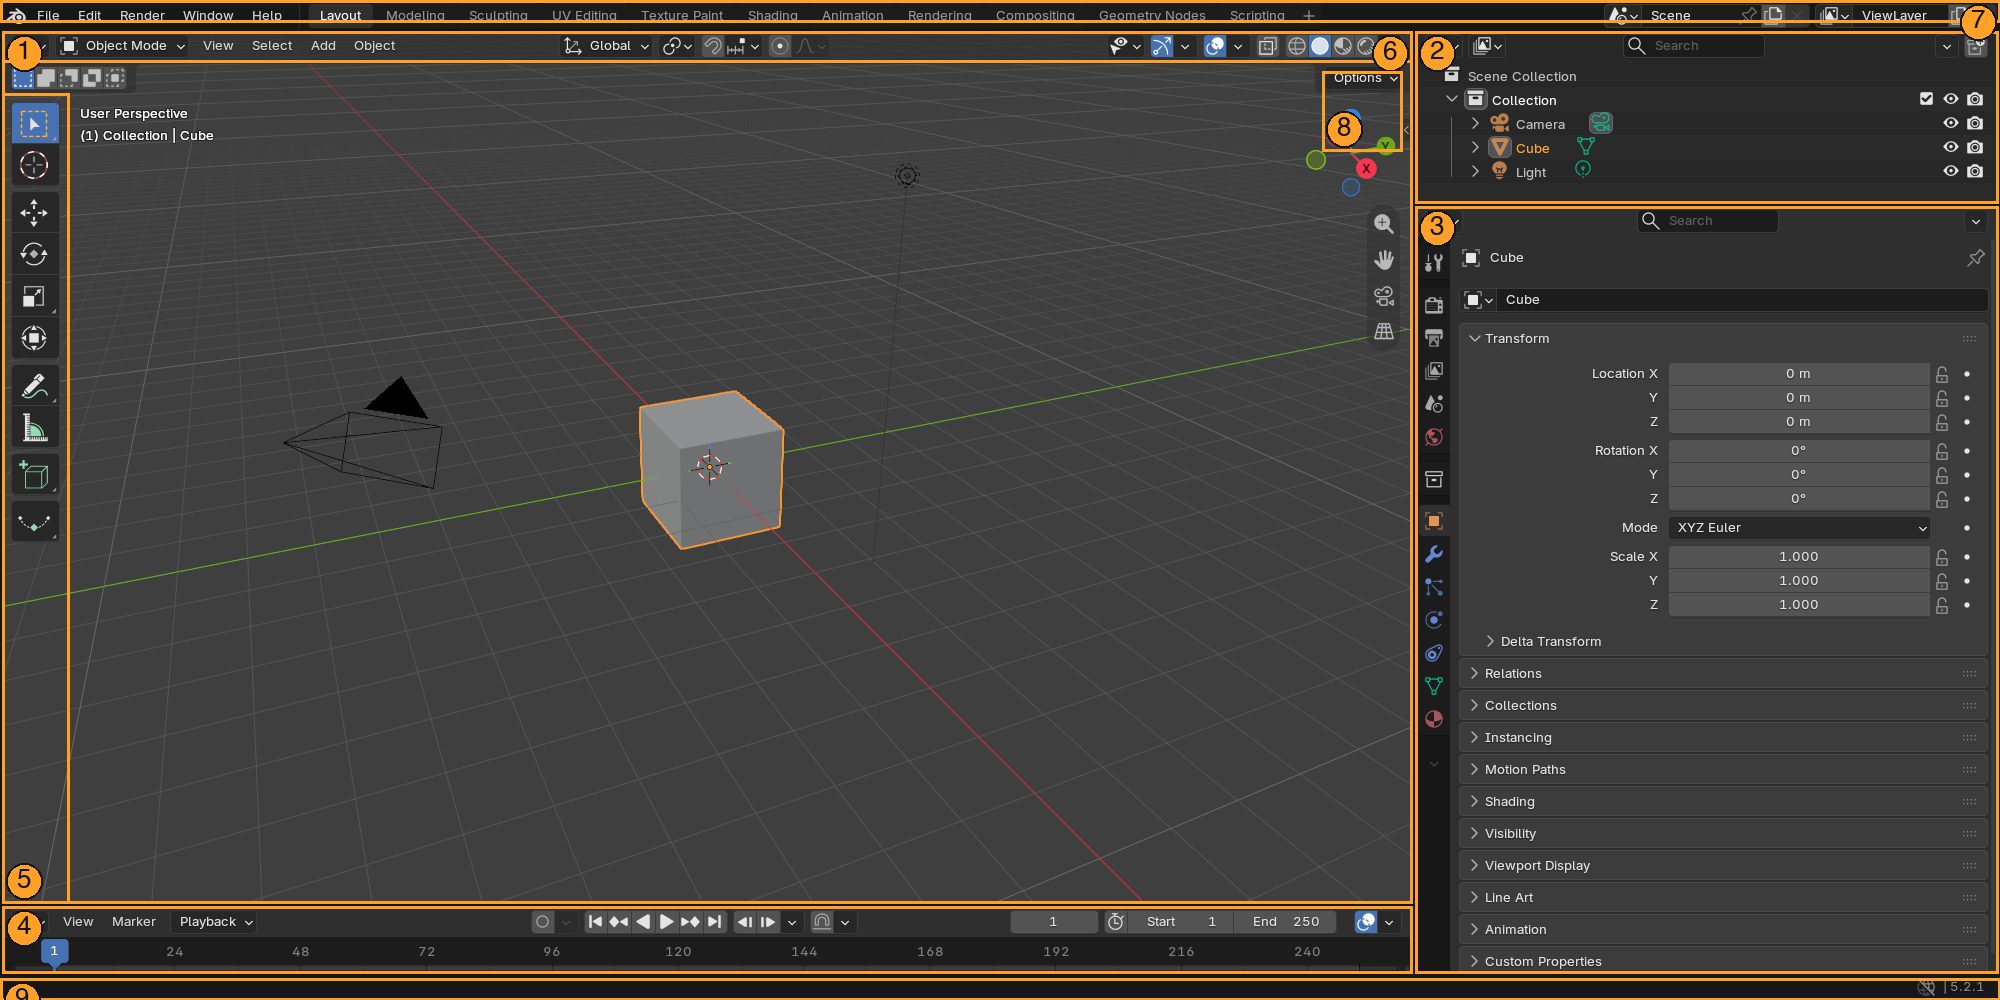
- 13D Viewport — where you look at and edit the scene. Most of your time is here.
- 2Outliner — a list of everything in the scene. Click a name to select it; the eye icon hides it.
- 3Properties editor — a column of tabs down its left edge. Object, Modifiers (the wrench), Material, and so on, for whatever is selected.
- 4Timeline — frames, playback, keyframes. Ignore it until Day 4.
- 5Toolbar — tools for the current mode. T hides and shows it.
- 6Header — the mode dropdown, the View / Select / Add / Object menus, and the shading buttons at the right end.
- 7Workspace tabs — Layout, Modeling, Sculpting, Animation… Each is a different arrangement of areas. Stay in Layout for now.
- 8Navigation gizmo — drag it to orbit, click an axis to look from that side.
- 9Status bar — shows what the mouse buttons will do right now. Glance at it when you are lost.
Keyboard shortcuts go to the area under the mouse pointer. Not the area you last clicked — the one the pointer is hovering over. If you press Tab while the pointer is over the Outliner, the viewport does not change mode. When a key "does nothing", move the mouse into the 3D Viewport and press it again. This is the single most common reason a step on these pages appears not to work.
Part 3 · 5 min The other program, and which way is up
Everything you make in Blender ends up in Unreal Engine, so it helps to see the two windows side by side once: they are laid out the same way, they name the same things differently, and they disagree about which direction is forward. Knowing that now saves a term of "why is it on its back".
The same thing, two names
Most of Days 1–5 happen in Blender, but every one of them ends in Unreal, and the two programs have different words for the same idea. Read this once now; the day pages will assume it.
| Idea | Blender says | Unreal says |
|---|---|---|
| A thing placed in the scene | Object | Actor |
| The geometry itself | Mesh (inside an object) | Static Mesh asset, placed as a Static Mesh Actor |
| A character's skeleton and skin | Armature + mesh parented to it | Skeletal Mesh + Skeleton asset |
| A clip of motion | Action (e.g. A_Walk) | Animation Sequence |
| How a surface looks | Material (nodes) | Material and Material Instance |
| The scene file | .blend — one file, everything inside | a Project folder of many .uasset files, and a Level (.umap) |
| Grouping | Collection | Folder in the Outliner, or a sub-Level |
| The list of everything | Outliner | Outliner |
| Numbers for the selected thing | N panel (Item) and the Properties editor | Details panel — Transform at the top |
| The pivot you move it by | Origin | Pivot |
| Units | meters | centimeters (uu); 1 m → 100 uu |
| Move · rotate · scale | G · R · S | W · E · R (gizmo handles) |
| Look around the viewport | middle-drag orbits · scroll zooms | right-drag looks · WASD while holding right-click flies · scroll changes speed |
| Frame the selected thing | Numpad . | F |
| Add something | Shift+A | + Add in the toolbar, or drag from the Content Drawer |
| Edit the vertices | Tab into Edit mode | there is no Edit mode — Unreal is where things are placed, Blender is where they are made (Modeling Mode exists, but not for this course) |
Part 4 · 10 min Moving around
Do each of these until it is automatic. Not once — until you stop thinking about it.
| Do this | Mouse | Keyboard |
|---|---|---|
| Orbit (look around the scene) | Middle-drag — or Alt + left-drag with emulation on. Or drag the navigation gizmo | Numpad 4 / 6 / 8 / 2 step round in 15° turns |
| Pan (slide sideways) | Shift + middle-drag. Or drag the hand icon under the gizmo | Ctrl + Numpad 4 / 6 / 8 / 2 |
| Zoom | Scroll wheel. Or drag the magnifier icon | Numpad + / − |
| Front / Right / Top view | Click the -Y, X or Z ball on the gizmo | Numpad 1 / 3 / 7 — Ctrl + the same key looks from the opposite side |
| Perspective ↔ Orthographic | Click the grid icon under the gizmo | Numpad 5. Ortho views have no perspective, which is what you want when fitting bones or reading proportions |
| Frame the selected object | — | Numpad . (the decimal point). The answer to "where did my model go" |
| Frame everything | — | Home |
With Emulate Numpad on, "Numpad 1" means the 1 above your Q key. The top-left corner of the viewport tells you which view you are in — User Perspective, Front Orthographic — so you never have to guess.
Part 5 · 10 min Selecting, adding, deleting — and the 3D cursor
- Select with the left mouse button
Click an object to select it; it gets an orange outline. Click-drag on empty space draws a box that selects everything inside it. Shift + click adds to the selection. A selects everything, Alt+A selects nothing. The last thing you clicked is the active object, in a lighter orange — several commands act on the active one specifically.
- Add things with Shift+A
With the pointer over the viewport, Shift+A opens the Add menu. Mesh → Plane, Mesh → Cube, Armature, Camera — every day on this track starts from this menu. The same menu is under Add in the header.
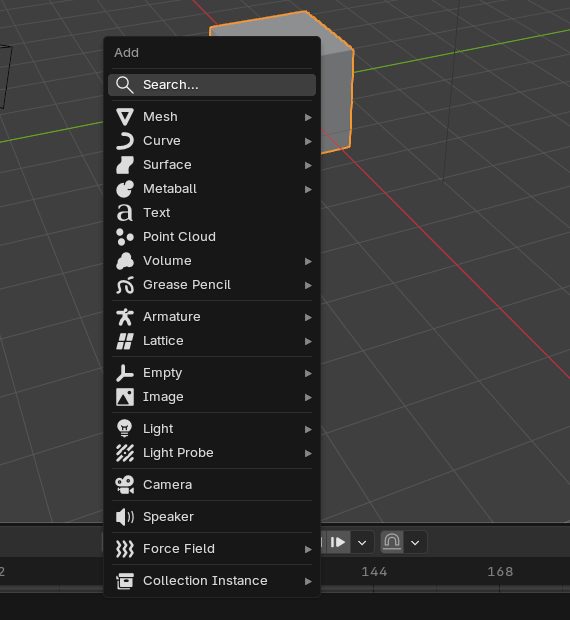
Shift+A in the viewport. Mesh holds the primitives (plane, cube, cylinder); Armature is where Day 3 starts. - Delete with X or Delete
X asks first; Delete does not. Either way, it deletes the selection. Undo is Ctrl+Z, and it goes back a long way.
- New objects appear at the 3D cursor
The small red-and-white ring in the viewport is the 3D cursor. It is not your mouse pointer and it is not an object — it is a position marker, and new objects are created wherever it is. A left-click with the cursor tool, or Shift + right-click, moves it. Shift+C puts it back at the origin and frames everything. When new objects start appearing in odd places, this is why.
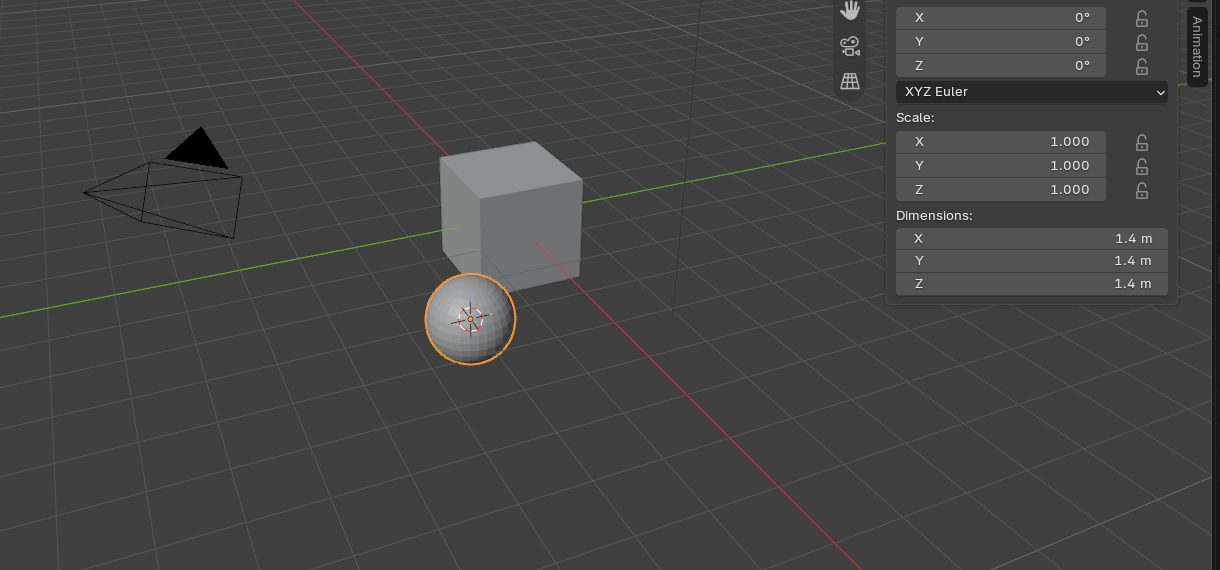
The 3D cursor was moved to the right of the cube, and the new sphere appeared there. The N panel shows the sphere at X 3 m, Y −2 m — the cursor's position, not the world origin.
Part 6 · 10 min Object mode and Edit mode
This is the distinction that matters most. Object mode treats the cube as one thing: move it, rotate it, duplicate it. Edit mode opens it up and lets you push its vertices, edges and faces around. Tab switches between them, with the pointer over the viewport.
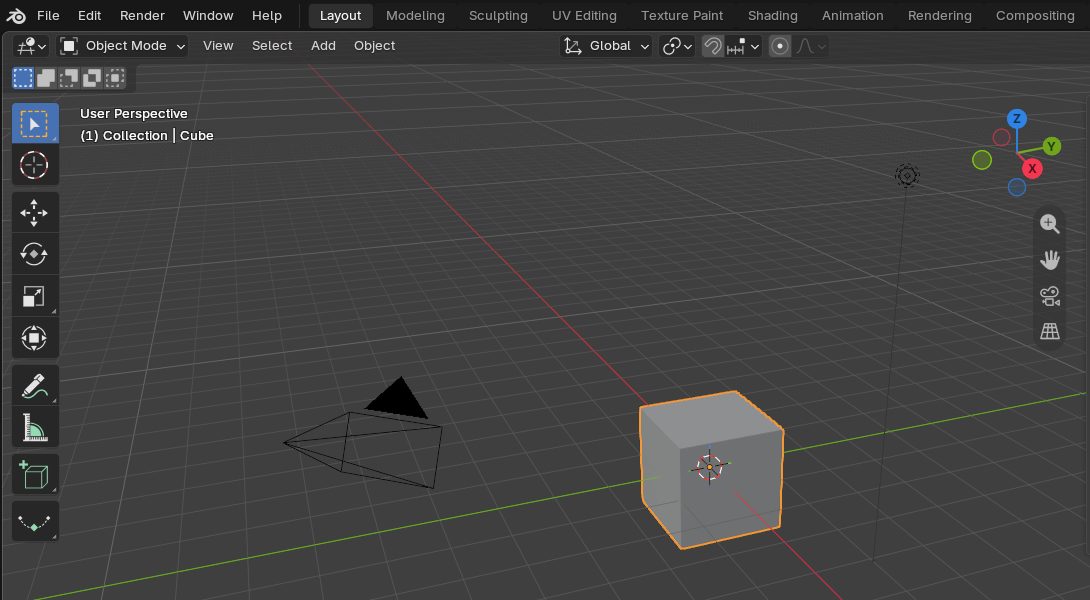
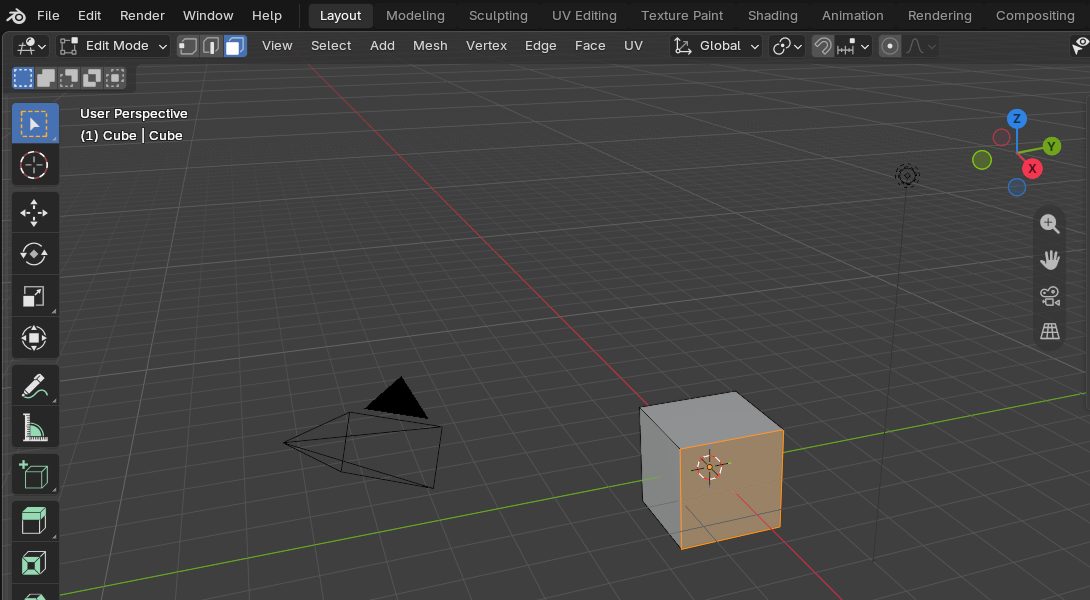
- In Edit mode, the three buttons beside the mode dropdown (or 1, 2, 3 on the main keyboard) choose whether you are selecting vertices, edges or faces. A vertex is a point; an edge joins two; a face is the flat surface between three or more.
- Sculpt mode, Pose mode and Weight Paint mode (later days) are also modes, chosen from the same dropdown. Each one changes what the toolbar, the header and the right-click menu contain. When your screen does not match a screenshot, check the mode first.
- The word mesh means the geometry itself — the vertices, edges and faces. The object is the container that holds a mesh, plus a position, rotation and scale. One mesh can live in several objects.
Part 7 · 10 min Move, rotate, scale — and the N panel
- G, R, S
Select the cube. Press G (grab) and move the mouse: the cube follows. Left-click to confirm, right-click or Esc to cancel. R rotates, S scales. The same three work on vertices in Edit mode, on bones in Pose mode — on everything.
- Constrain to an axis, then type a number
Press G then Z: the cube moves only up and down. Press G, Z, then type 2 and Enter: it moves exactly two meters up. R Z 90 rotates a quarter turn. S 2 doubles the size. Red is X, green is Y, blue is Z — the same colors as the gizmo.
- The N panel is where you read the truth
With the pointer over the viewport, press N. A sidebar slides out on the right; its Item tab shows the selected object's numbers. Press N again to hide it. You can type into any of these fields.
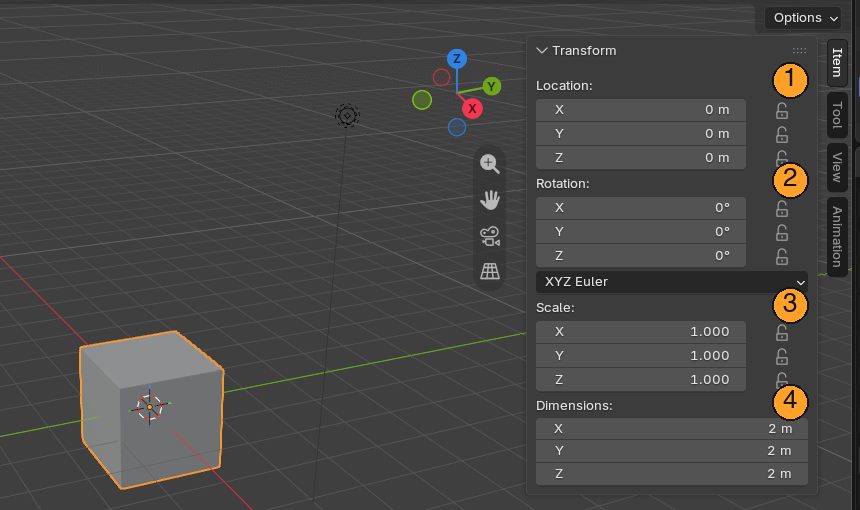
The N panel, Item tab. 1 Location — where the object's origin sits. 2 Rotation. 3 Scale — a multiplier on the geometry, 1.000 meaning none. 4 Dimensions — how big it actually is, in meters. Scale and Dimensions are two different claims. Dimensions tell you the real size. Scale tells you whether that size is being achieved by a multiplier that Blender is still holding onto. Day 1 is entirely about that gap; for now, just notice that both exist.
- Ctrl+A — Apply
Opens the Apply menu. All Transforms bakes the current position, rotation and scale into the geometry, so Scale reads 1, 1, 1 and Dimensions stay the same. You will do this before every export, all term.
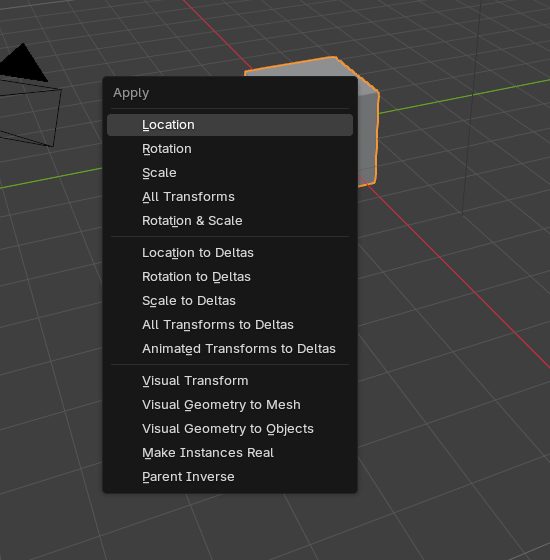
Ctrl+A over the viewport in Object mode. All Transforms is the one Day 1 uses.
Part 8 · 5 min Looking at things properly
Z over the viewport opens the shading pie — a round menu that closes when you pick. Wireframe shows edges only, which is how you see the density of a mesh. Solid is the working default. Material Preview and Rendered are for looking at color and light. The same four choices are the little spheres at the right end of the header.
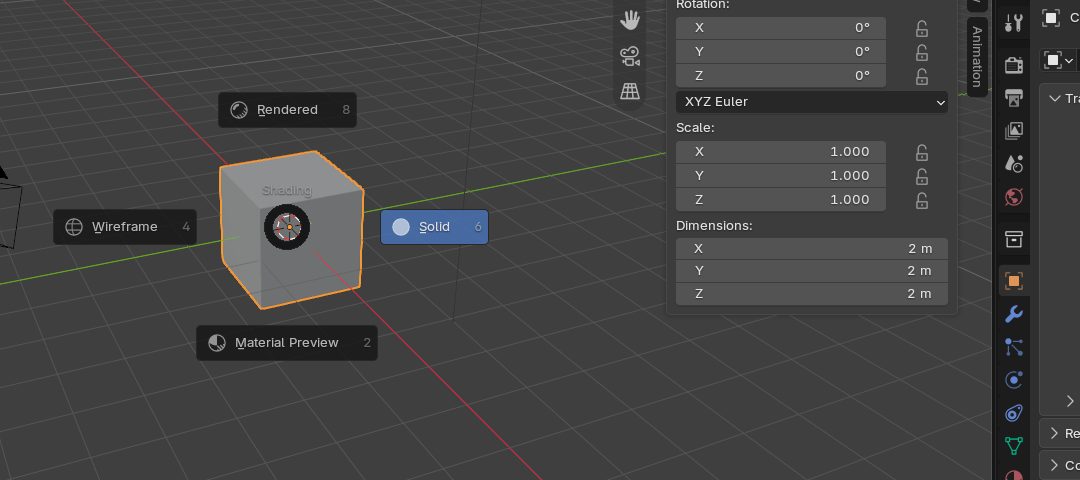
Two more things live in that corner of the header: the Overlays toggle (the two circles), which switches the grid, outlines and the statistics readout on and off, and its dropdown, where Statistics adds a live vertex and triangle count in the top-left of the viewport. Day 2 asks you to turn that on.
Part 9 · 5 min The Properties editor and what a modifier is
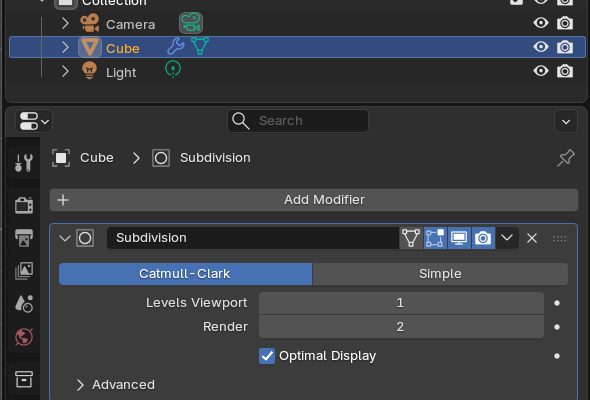
The column of icons down the left of the Properties editor are tabs. The orange square is Object (the same numbers as the N panel), the blue wrench is Modifiers, the green triangle is the object's Data (mesh settings, or armature settings for a rig), the red sphere is Material. Hover any icon for its name.
A modifier is an effect stacked on an object that changes how it looks without touching the underlying mesh. Subdivision Surface smooths a cube into a ball; Displace pushes a surface around by a texture; Decimate reduces the polygon count. They stack top-to-bottom, you can switch each off, and Apply (from the small dropdown on the modifier) bakes it into the real mesh when you are done. Day 2 uses two of them.
Part 10 · 3 min Finding things you don't know the key for
- F3 search. Over the viewport, press F3 and type the name of any command. Almost everything on these pages can be reached this way if you forget the key.
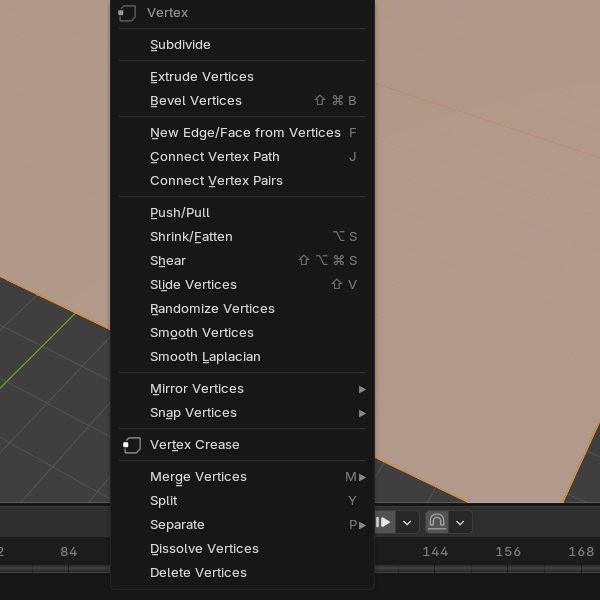
- Right-click. Opens a context menu that changes with the mode and with what is selected. In Edit mode with vertices selected it starts with Subdivide — the first step of Day 2.
- Type inside a menu. Once a menu is open, typing the underlined letter of an item runs it. In the vertex menu, S is Subdivide.
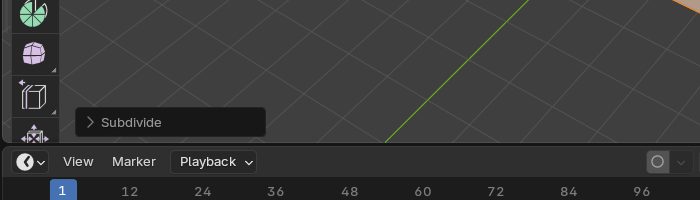
- The Adjust Last Operation panel. After most commands, a small collapsed panel appears in the bottom-left of the viewport with the command's name on it. Click it to open the settings for what you just did — for Subdivide, the number of cuts. It disappears as soon as you do something else, so adjust first, then move on. F9 reopens it.
Part 11 · 2 min Saving, and the five traps
Ctrl+S saves a .blend file. Save early and give it a real name; Blender's autosave is a backstop, not a plan. Then keep this list somewhere you can see it:
| Symptom | Almost always | Fix |
|---|---|---|
| A key does nothing | Pointer was not over the viewport | Move the mouse into the 3D Viewport, press again |
| Can't select a vertex / can't move the whole object | Wrong mode | Look at the header. Tab |
| Numpad view keys do nothing | Laptop, no numpad | Preferences → Input → Emulate Numpad |
| Model has vanished | You zoomed or panned away | Select it in the Outliner, then Numpad . — or Home |
| New objects appear somewhere odd | 3D cursor moved | Shift+C |
| A panel you had is gone | N or T got pressed | Press it again with the pointer over the viewport |
Glossary The words the next days use without explaining
| Word | Means |
|---|---|
| Origin | The single point an object is positioned, rotated and scaled around. The small dot you see when it is selected. Not necessarily its center. |
| Transform | Location, rotation and scale together. "Apply transforms" bakes them into the geometry. |
| Primitive | A starting shape from the Add menu: plane, cube, cylinder, sphere. |
| Subdivide | Cut each face into smaller faces. More vertices to work with; that is your resolution. |
| Proportional editing | Moving one vertex drags its neighbors along in a soft falloff. Toggled with O; the scroll wheel sizes the falloff while you drag. |
| Sculpt mode | A mode where you push the surface around with brushes instead of moving individual vertices. |
| Modifier | A stacked, reversible effect on an object — see Part 8. |
| Armature, bone, rig | An armature is an object made of bones. A rig is an armature set up with controls so it can be posed sensibly. Rigify builds one for you. |
| Parent | Attaching one object to another so it follows it. A mesh parented to an armature with automatic weights is how a character gets skinned. |
| Weight | How much a bone pulls on a vertex, from 0 to 1. Painted in Weight Paint mode; blue is 0, red is 1. |
| Pose mode | The mode for moving bones of an armature. Object mode moves the whole armature; Edit mode changes where the bones are; Pose mode animates them. |
| Keyframe | A recorded value at a frame. I inserts one. Blender interpolates between keyframes. |
| Timeline, Dope Sheet, Graph Editor | Three views of the same keyframes: when they are (Timeline), which channels they are on (Dope Sheet), and the curves between them (Graph Editor). |
| Action | A named animation clip — A_Walk, A_Idle. What gets exported. |
| FBX | The file format that carries meshes, rigs and animation into Unreal. |
Drill · 10 min Do these in order, without looking anything up
If you can get through the list without stopping, you are ready for Day 1. If you stall on one, that is the part to re-read.
- Shift+C Reset the cursor and frame everything.
- Shift+A Add a plane.
- G Z 1 Move it one meter up. Read the Location in the N panel to prove it.
- S 3 Scale it to three times. Read the Scale field: it says 3. Read the Dimensions: 6 m.
- Ctrl+A Apply All Transforms. Scale now reads 1; Dimensions still 6 m.
- Tab Into Edit mode. Press 3 for face select, click the face, press 1 for vertex select, press A to select all.
- Right-click → Subdivide. Open the Adjust Last Operation panel and set Number of Cuts to 10.
- Z Switch to wireframe and look at the grid you just made. Z back to solid.
- O Turn proportional editing on. Click one vertex in the middle, G Z, move the mouse, scroll to change the falloff size, click to confirm. You made a hill.
- Tab Back to Object mode. Wrench tab → Add Modifier → Subdivision Surface. Then remove it with the X.
- Numpad 7 then Numpad 1 then Numpad 5. Say out loud which view you are in each time.
- Orbit so you are looking at your hill from roughly eye height rather than from above. Save the file as day0.blend.
- You can point at the Outliner, the Properties editor, the header and the toolbar and name them.
- You can orbit, pan and zoom, and recover a lost object with Numpad .
- You can say what the header shows when you are in Edit mode versus Object mode.
- You have typed an exact value into a transform and read it back in the N panel.
- You have found the Adjust Last Operation panel once and changed a value in it.
- You know that shortcuts go to the area under the mouse — and you will remember it tomorrow when a key "does nothing".