- Choose between root motion and in-place, and say what each one costs.
- Export animation clips that arrive in Unreal at the right speed, under sane names.
- Import a character and its animations against a single skeleton, on purpose.
- Diagnose a broken import in under a minute using the triage table.
Brief · 15 min Decide before you animate
There are two ways a character can move through a world, and the decision has to be made before the animation exists — not discovered afterwards, when changing it means redoing the clip.
| In-place | Root motion | |
|---|---|---|
| What moves | The feet cycle; the character stays at the origin | The root bone carries the character forward |
| What drives position | The game moves the collision capsule | The animation moves the capsule |
| Strength | Simple, forgiving, easy to blend | Higher fidelity — feet stay planted, weight reads properly |
| Cost | Feet can slide if the speeds disagree | More setup, and it needs Day 3's root bone to exist |
| Use it when | Most student work, most of the time | The motion itself matters — a stumble, a turn, a jump |
Pick one per clip and stay consistent. Mixing them is what produces the two classic bugs: the character who moonwalks, sliding across the ground while their legs cycle at a different speed, and the character who runs away from their own collision capsule, leaving the thing the game thinks they are behind.
Build · 55 min Export, import, prove it
- Name your clips like assets, not like accidents
A_Walk, A_Idle, A_Turn_L. Not Action.001, not walk_final_v3_REAL. You will be reading these names inside an animation blueprint at some point, in a list, under time pressure.
Where: the Dope Sheet’s header has its own mode dropdown — switch it to Action Editor and the clip’s name appears in the header field, ready to retype.
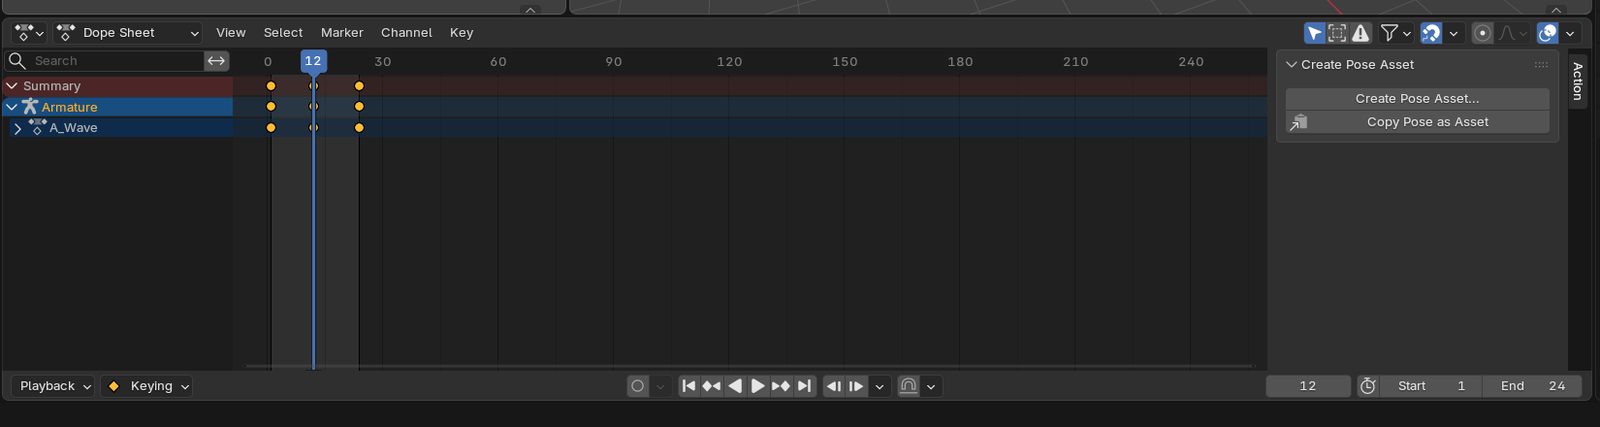
The Dope Sheet with the armature's action named A_Wave. Rename the action in the Dope Sheet's Action Editor mode, or in the Properties editor — never leave it as Action.001. - Match the frame rate to the engine before exporting
Set the Blender scene fps to whatever your Unreal project uses. A mismatch is nasty precisely because nothing errors — everything simply plays at a subtly wrong speed, and the character feels slightly rushed or slightly drugged in a way that is hard to name and easy to blame on the animation.
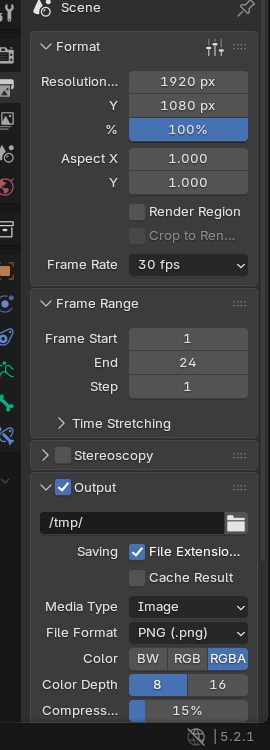
Output properties: Frame Rate set to 30 fps, frame range 1–24. Match this to the Unreal project before you export, not after. - Export with Bake Animation on
Baking resolves all your constraints, drivers and IK into plain per-bone keyframes, which is what FBX can actually carry. Select the mesh, Shift-click the rig — the same pair, in the same order, as binding on Day 3 — and tick Limit to Selected Objects so stray lights and cameras stay home. While you are learning, one FBX per clip has the fewest moving parts and the fewest ways to go wrong.
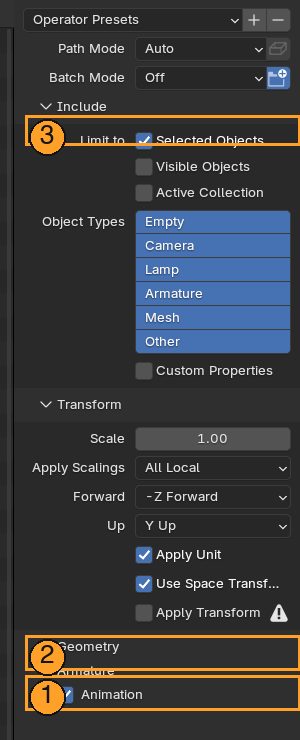
File → Export → FBX with the character and its rig selected. 3 Limit to Selected Objects. Then open 2 Armature (tick Only Deform Bones, untick Add Leaf Bones) and 1 Animation (Bake Animation on). The panels are collapsed by default; click their headers. - Import the character first — then the animations
Getting in: importing in Unreal is a drag — literally: drag the FBX into the Content Drawer (Ctrl+Space), and the FBX Import Options dialog opens. Order matters. Import the skeletal mesh first, which creates a Skeleton asset. Then import each animation FBX — and the Skeleton dropdown at the top of that dialog is the one that matters: point it at that same skeleton.
Skip this and Unreal helpfully creates a second skeleton, and now you have two characters that look identical and cannot share a single animation between them. It is a confusing afternoon, and it is entirely avoidable by reading that one dropdown.
- Retarget with IK Rig and IK Retargeter
If you need to move animation between skeletons, UE5 does it with IK Rig + IK Retargeter. Be warned when you go looking for help: a great many tutorials still demonstrate the pre-UE5 retargeting flow, which no longer resembles what is in your editor. If a tutorial's panels do not match your screen, it is not you — check its date.
- The round trip — put it all together
One level. Day 2's terrain, and Day 4's character standing on it. Then check all of it at once:
Correct scale against the mannequin. Character on the ground, not floating above it or sunk into it. The walk loops cleanly. No junk bones in the skeleton. No 90° rotation. No terracing on the slopes. If all of that is true, your pipeline works end to end, and you know it because you watched it.
Work down the triage table below and produce each symptom on purpose. Export an 8-bit heightmap and look at the terracing. Export the Rigify control bones and see the junk skeleton. Mismatch the frame rate and watch the walk speed up.
Being able to cause a bug deliberately is what makes you able to recognize it instantly later. Ten minutes of breaking things now is worth more than any amount of reading.
Reference The triage table
Keep this open all semester. Almost every Blender-to-Unreal problem you hit this term is one of these sixteen, and each one has a single most-likely cause.
| Symptom | Almost always | Fix |
|---|---|---|
| Imports 100× too big or too small | Unit mismatch | Check export scale; measure it in Unreal |
| Arrives rotated 90°, or on its back | Forward/up axis pair, or armature rotation | Verify by importing, not by trusting a setting |
| A modifier or export behaves strangely | Unapplied scale or rotation | Ctrl+A → All Transforms |
| Terrain stair-steps on slopes | 8-bit heightmap | Re-export at 16-bit |
| Landscape has seams, or LODs badly | Non-recommended landscape resolution | Use the sizes the editor suggests |
| Cliff overhang will not sculpt in Landscape | It is a heightfield — one height per point | Model it as a mesh in Blender |
| Rock collides wrong, or tanks performance | Auto-collision on complex geometry | Author a UCX_ collision mesh |
| Skeleton is full of junk bones | Exported Rigify control bones | Export deform bones only |
| Character slides, or moonwalks | Root motion vs in-place mismatch | Pick one per clip, consistently |
| Animation plays at the wrong speed | Frame-rate mismatch | Match the Blender scene fps to Unreal |
| Walk cycle stutters at the loop | Doubled frame at the loop point | Duplicate frame 1 to the end, play one short |
| Shoulder or hip crumples when posed | Weight painting | Paint weights; hunt for stray influences |
| Mirror or pose-flip stopped working | Bone naming | Restore the .L / .R suffixes |
| Two incompatible characters in Unreal | Imported a second skeleton by accident | Import animations against the existing skeleton |
| Retargeting tutorial does not match the editor | UE5 uses IK Rig + IK Retargeter | Ignore pre-UE5 tutorials |
| Model looks inside-out | Flipped normals | Select all → Shift+N |
- A terrain you sculpted and a character you animated are in one Unreal scene.
- Both are at correct scale, checked against the mannequin.
- The character stands on the ground and the walk loops without a stutter.
- You caused at least three symptoms from the triage table deliberately, and recognized each one.
After Day 5
You now have the Blender half of this course. It is not the whole of Blender and it is not meant to be — box modeling, UV layout, texturing, baking, Geometry Nodes, Cycles rendering and physics are all outside these five days. What you have is the part that touches Unreal, which is the part this course runs on.
The habit worth keeping: when something arrives broken, read the triage table before you read a forum. The answer is on it about four times out of five, and finding it there takes a minute instead of an evening.