- Choose between root motion and in-place, and say what each one costs.
- Export clips that arrive in the engine at the right speed, under sane names.
- Import a character and its animations against a single skeleton, on purpose.
- Diagnose a broken import in under a minute using the table at the bottom of this page.
Brief · 15 min Decide before you export
There are two ways a character moves through a world, and the choice has to be made before the animation exists — not discovered afterwards, when changing it means redoing the clip.
| In-place | Root motion | |
|---|---|---|
| What moves | The feet cycle; the character stays at the origin | The root bone carries the character forward |
| What drives position | The game moves the character around | The animation moves them, and the game follows |
| Strength | Simple, forgiving, easy to blend | Higher fidelity — feet stay planted, weight reads properly |
| Cost | Feet can slide if the speeds disagree | More setup, and it needs the root bone Day 4 checked for |
| Use it when | Most of your work, most of the time | The motion itself matters — a stumble, a turn, a jump |
Pick one per clip and stay consistent. Mixing them is exactly what produces the two classic bugs: a character who moonwalks, sliding across the ground while their legs cycle at a different speed, and a character who runs away from where the game thinks they are.
Build · 30–45 min Export, import, check
- Name clips like assets, not like accidents
A_Walk, A_Idle, A_Run — not Action.001. You will be reading these names inside an Animation Blueprint in Week 10, in a list, under time pressure.
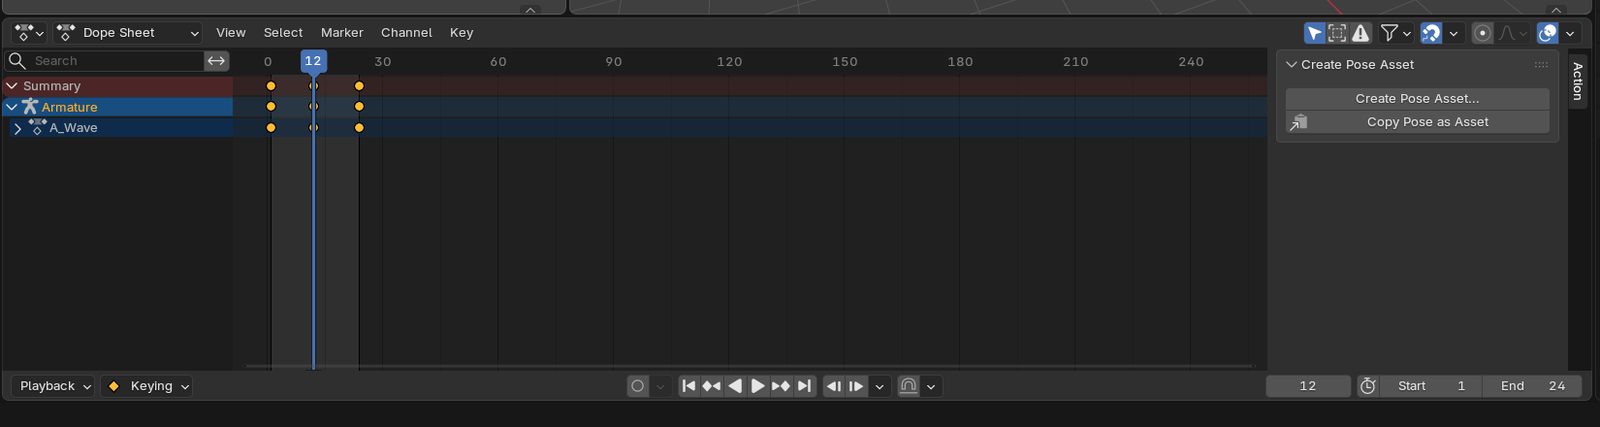
The Dope Sheet with the armature's action named A_Wave. Rename the action in the Dope Sheet's Action Editor mode, or in the Properties editor — never leave it as Action.001. - Match your frame rate to the engine's
Set the Blender scene fps to your Unreal project's. A mismatch is nasty precisely because nothing errors — everything just plays at subtly the wrong speed, and the character feels slightly rushed or slightly drugged in a way that is hard to name and easy to blame on the animation.
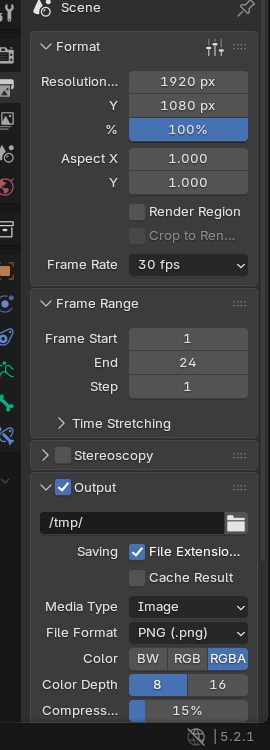
Output properties: Frame Rate set to 30 fps, frame range 1–24. Match this to the Unreal project before you export, not after. - Export the character as glTF, with its animation
Select the rig and the three meshes under it (click Armature in the Outliner, then right-click it → Select Hierarchy). File → Export → glTF 2.0: format glTF Binary (.glb), Limit to Selected Objects under Include, and under Animation leave Animation ticked so the walk travels with the skeleton. One .glb per clip while you are learning; it has the fewest moving parts.
Why not FBX for the character, when Day 3 used it for the set? A rigged FBX out of Blender carries a known units-and-scale quirk that breaks retargeting in Unreal; glTF does not, and Unreal 5.8 reads it natively. If you ever must use FBX for a rig, the settings below are the ones: Only Deform Bones is harmless here (this rig has no other kind), untick Add Leaf Bones, Bake Animation on.
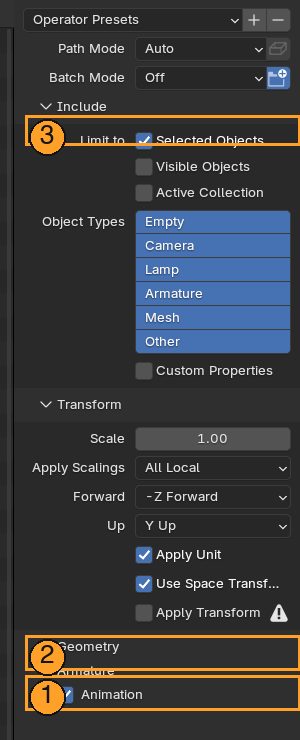
The FBX fallback, for reference. File → Export → FBX with the character and its rig selected. 3 Limit to Selected Objects. Then open 2 Armature (tick Only Deform Bones, untick Add Leaf Bones) and 1 Animation (Bake Animation on). The panels are collapsed by default; click their headers. - Import the character first — then the animations
Order matters. Drop the first .glb into the Content Drawer and let it import as a Skeletal Mesh, which creates a Skeleton asset (and, because the walk is inside the file, an Animation Sequence). Then import each further clip and explicitly point it at that same skeleton — the Skeleton dropdown in the import options. Put the character on the set you exported on Day 3.
Skip this and the engine helpfully makes a second skeleton, and now you have two characters that look identical and cannot share a single animation. It is the most common way students end up with two incompatible copies of their own character.
- Check it in the engine, not in Blender
Correct scale against the mannequin. Feet on the ground. The loop clean. No bones you did not make. If all four are true, your pipeline works end to end — and you know because you looked.
Reference When something goes wrong
Almost every problem in your first weeks is on this list. Keep it open — the answer is here about four times out of five, and finding it takes a minute instead of an evening.
| What you see | What it almost always is |
|---|---|
| Imported 100× too big or too small | Units. Measure it in the engine rather than guessing. |
| Arrives rotated, or lying on its back | The forward/up axis settings when exporting. |
| A modifier behaves strangely | Unapplied scale — Ctrl+A → All Transforms. |
| New objects appear in odd places | The 3D cursor moved — Shift+C. |
| Model looks inside-out or blotchy | Flipped normals — select all in Edit mode, Shift+N. |
| Terrain stair-steps on slopes | An 8-bit heightmap. Re-export at 16-bit. |
| You walk straight through a rock | Collision, not modeling. Complex meshes need collision authored. |
| Shoulder or hip crumples when posed | Weight painting in that spot. |
| Mirroring stopped working on a rig | Bone names lost their _l / _r (or .L / .R). |
| Walk cycle stutters once per loop | A duplicated frame at the loop point. |
| Skeleton full of bones you did not make | A Rigify-style rig exported with its control bones, not just the deform bones. The supplied rig cannot do this. |
| Rigged character arrives the wrong size, or retargets badly | Exported as FBX. Use glTF for the character. |
| Animation plays at the wrong speed | Frame rate mismatch between Blender and the engine. |
| Character slides, or moonwalks | Root motion and in-place mixed between clips. |
| Two incompatible copies of your character | A second skeleton imported by accident. |
| You cannot find your model | Select it in the outliner, then Numpad . |
Work down that table and produce each symptom on purpose. Export the set with the wrong axis and watch it land on its back. Export the character as FBX instead of glTF and measure what arrives. Mismatch the frame rate and watch the walk speed up.
Being able to cause a bug deliberately is what makes you able to recognize it instantly later. Ten minutes of breaking things now is worth more than any amount of reading.
- You chose in-place or root motion deliberately, and can say why.
- Clips are named like assets and the frame rates match.
- Character and animations are on one skeleton in the engine.
- You caused at least three symptoms from the table on purpose and recognized each.
That is the core path
Six days, and you have the part of Blender this course runs on. Box modeling, UV layout, texturing and baking are all taught properly in class — Weeks 2 through 5 — so they are deliberately not here.
What follows is optional: four short sessions on Grease Pencil, which you take because you want to. Nothing in the course depends on it.